Turnout Installation and Controls
Model Railroading Techniques, Building Projects & Tips
Turnouts and the Control Mechanisms Used
The first step was to determine just what mechanism we would use to throw the turnouts. After careful review of the options available on the market and having toured enough railroads to know what worked best versus what did not, we made the decision to go with Tortoise Switch machines. Tortoise is incredibly reliable, it exerts enough force to easily push or pull the turnout in the desired direction and perhaps best of all, can easily be replaced if it wears out. Many will dismiss it due to cost, that can not be overlooked. At today’s prices, around $13 per machine, it adds up very quickly. However, if you watch the price on websites such as eBay or the various internet hobby shops, you can usually find them for much less. Buying in bulk is the best bet to lower the per machine cost. Another way to go is to look for them at local swap meets. Both new and used machines are readily found at swap meets. Given the reliability of the Tortoise, do not be afraid to buy used machines.
In our system, we have some basic needs, our materials list (per turnout) includes the following
- Double stick carpet tape. One roll is sufficient for a large layout.
- Minimum of two 1/4″ screws.
- 1/16th inch K&S brass tube.
- 1/32nd inch K&S music wire.
- Pin vise.
- 2 part, 5 minute epoxy.
- Assorted drill bits.
- Tortoise switch machine.
- 10 pin edge connector.
- needle nose pliers.
PART I
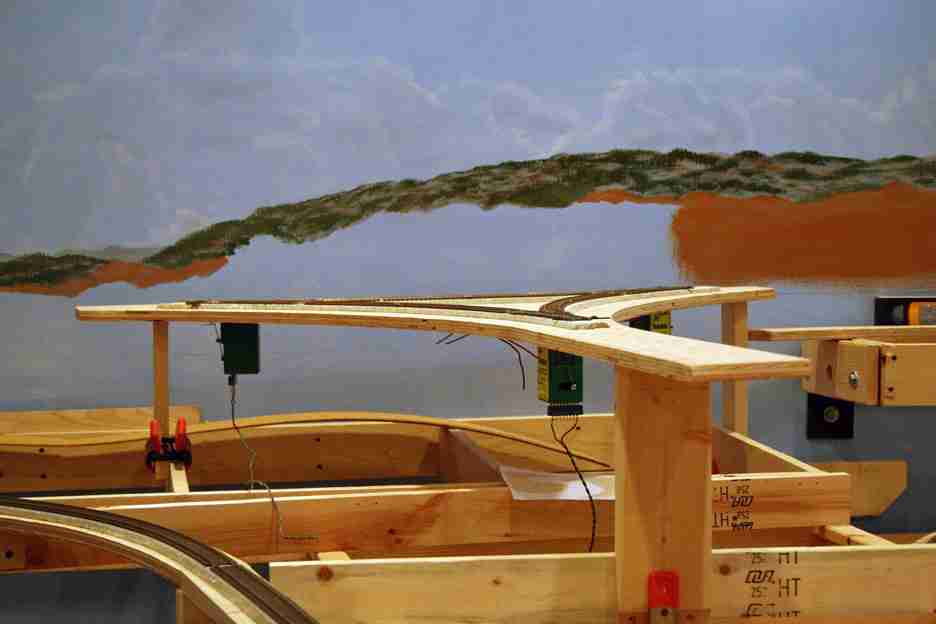
As we begin the discussion of the turnout control installation, be sure to click open the picture at the left for both visual and written detail. Each picture in the series will have its own information. The process begins above the table.

If your turnout has a center hole in the throwbar, you can skip this step, otherwise, drill a hole as close to the center of the throwbar as possible. The hole should be only slightly larger than the diameter of the music wire. Too large a hole will allow too much movement of the wire when thrown by the tortoise.
Drill a hole two ties back from the throwbar all the way through the roadbed and subroadbed. This hole should be slightly larger than the 1/16th brass tube. Make a practice hole on scrap wood to ensure that you can push the tube through with slight pressure. You want it to go through the hole with pressure, but not drop through on its own.
Drop a length of tube into the hole and then press down at the top so that the open end is equal to the top of the tie. Then go under the table and mark the tube at 1/4 inch depth below the table bottom. Pull the tube back out and use a dremel or similar cutoff tool to cut the tube to length. File any burrs left from the cutting process.
Make some 5 minute epoxy. Have some toothpicks handy for spreading the epoxy.
Insert the tube at the top of the hole about 1/4 inch into the hole. This protects the bottom edge of the tube from epoxy blocking the opening. Spread some epoxy on the tube to about half way. Do not put epoxy on the entire tube or the excess will fill up the opposite hole. Push the tube into the hole slowly, if excess epoxy is prevalent, wisk it away with the toothpick. Push the tube down to the top of the tie. Let dry thoroughly.
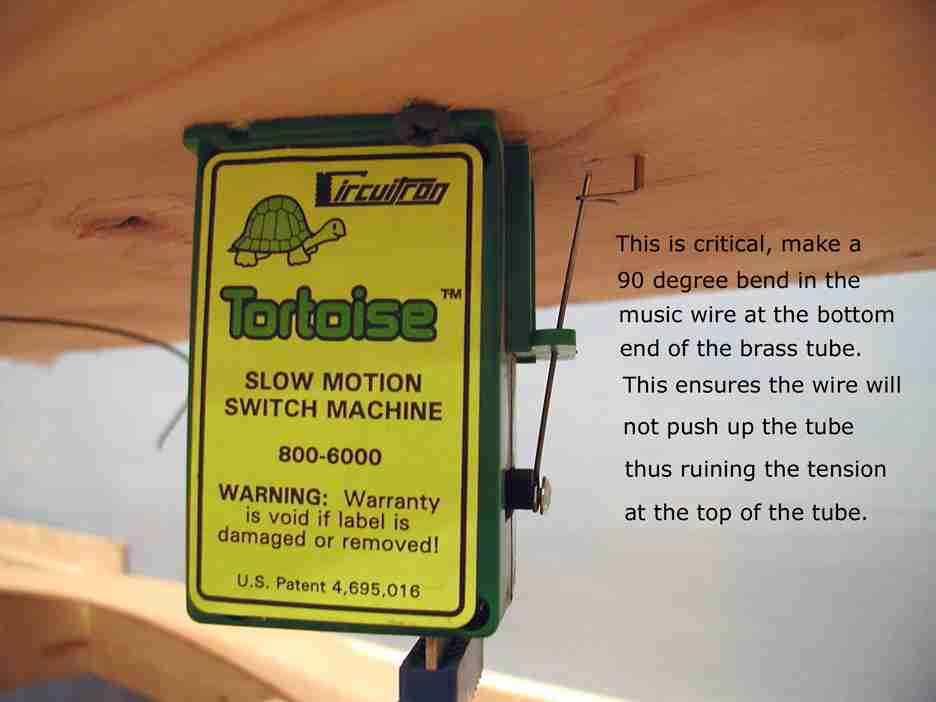
Toggle ContentaBend a 1/16th inch long 90 degree bend in the end of the music wire using needle nose pliers. Place this “hook point” in the center hole of the throwbar and move turnout points back and forth to check that music wire does not drag along roadbed. If it does, the length of your music wire needs to be trimmed.
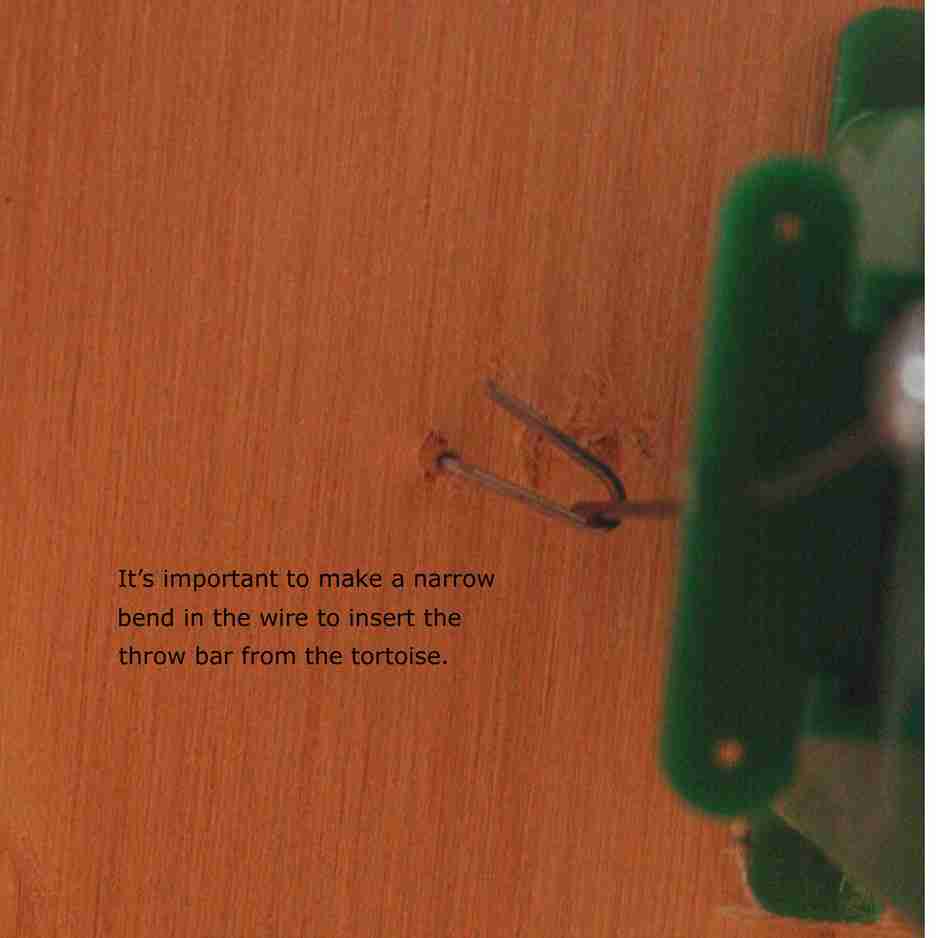
With the turnout points centered in the track (not off to one side, VERY important!), place the hook point into the center hole and the opposite end toward the tube. Take your pliers and grab the music wire on the points side of the tube. Get a firm grip at that point then bend the remaining wire parallel to the hook point. This step will take some practice as bending the wire so that it fits down the tube and still allows the hook point to sit in the center hole is not the easiest thing to master, but once you get the hang of it, it’s not that hard either.
Now insert the long end of the wire down the tube and test that the hook point fits snug, but does not bind. Throw the throwbar back and forth to check for fit and ease of throw. It should be snug, not loose. If it appears to bind, try altering the angle of the short length of wire between the tube and the hook. Once satisfied with the throw, your ready for Part II.
If your turnout has a center hole in the throwbar, you can skip this step, otherwise, drill a hole as close to the center of the throwbar as possible. The hole should be only slightly larger than the diameter of the music wire. Too large a hole will allow too much movement of the wire when thrown by the tortoise.
Drill a hole two ties back from the throwbar all the way through the roadbed and subroadbed. This hole should be slightly larger than the 1/16th brass tube. Make a practice hole on scrap wood to ensure that you can push the tube through with slight pressure. You want it to go through the hole with pressure, but not drop through on its own.
Drop a length of tube into the hole and then press down at the top so that the open end is equal to the top of the tie. Then go under the table and mark the tube at 1/4 inch depth below the table bottom. Pull the tube back out and use a dremel or similar cutoff tool to cut the tube to length. File any burrs left from the cutting process.
Make some 5 minute epoxy. Have some toothpicks handy for spreading the epoxy.
Insert the tube at the top of the hole about 1/4 inch into the hole. This protects the bottom edge of the tube from epoxy blocking the opening. Spread some epoxy on the tube to about half way. Do not put epoxy on the entire tube or the excess will fill up the opposite hole. Push the tube into the hole slowly, if excess epoxy is prevalent, wisk it away with the toothpick. Push the tube down to the top of the tie. Let dry thoroughly.
Toggle ContentaBend a 1/16th inch long 90 degree bend in the end of the music wire using needle nose pliers. Place this “hook point” in the center hole of the throwbar and move turnout points back and forth to check that music wire does not drag along roadbed. If it does, the length of your music wire needs to be trimmed.
With the turnout points centered in the track (not off to one side, VERY important!), place the hook point into the center hole and the opposite end toward the tube. Take your pliers and grab the music wire on the points side of the tube. Get a firm grip at that point then bend the remaining wire parallel to the hook point. This step will take some practice as bending the wire so that it fits down the tube and still allows the hook point to sit in the center hole is not the easiest thing to master, but once you get the hang of it, it’s not that hard either.
Now insert the long end of the wire down the tube and test that the hook point fits snug, but does not bind. Throw the throwbar back and forth to check for fit and ease of throw. It should be snug, not loose. If it appears to bind, try altering the angle of the short length of wire between the tube and the hook. Once satisfied with the throw, your ready for Part II.
PART II
PART III
Add a 10 pin edge connector to the tortoise points and wire the connector to your control switch on your control panel. The tortoise machine comes with a wiring diagram for your use in completing this step.
Add a 10 pin edge connector to the tortoise points and wire the connector to your control switch on your control panel. The tortoise machine comes with a wiring diagram for your use in completing this step.
SPECIAL NOTE
We have found that the throw rod provided with the tortoise is too thin to provide adequate pressure to each side of the turnout. As such, we replace the rod with heavier wire. This requires making a circular bend in one end of the wire that is larger than the screw which holds it to the throw mechanism inside the machine. We then cut the throw rod to proper length. You may find that the provided rod is sufficient, this is just our experience.
We hope this gives you cause to add this process to your layout. We know that you might have questions, please feel free to contact us if you do.